
Spring REST Docs
The aim of Spring REST Docs is to help you produce accurate and readable documentation for your RESTful services.
Writing high-quality documentation is difficult. One way to ease that difficulty is to use tools that are well-suited to the job. To this end, Spring REST Docs uses Asciidoctor by default. Asciidoctor processes plain text and produces HTML, styled and laid out to suit your needs. If you prefer, you can also configure Spring REST Docs to use Markdown.
출처 : https://docs.spring.io/spring-restdocs/docs/current/reference/htmlsingle/
공식 문서에 따르면 Spring REST Docs는 RESTful 서비스에 대한 정확하고 읽기 쉬운 문서를 작성하기 위해 사용하는 도구이다. 사용해 봤다면 이 이야기가 와닿을 거라고 생각한다. 생성된 스니펫을 보면 어떤 HTTP 메서드가 사용되고, 어떤 파라미터가 있으며 요청과 응답이 이루어지는지에 대한 상세한 정보들이 나와있다.
Spring REST Docs는 기본적으로 Asciidoctor를 사용하는데 정해진 문법을 사용해서 최종적으로 html 파일을 만들 수 있어서 문서를 깔끔하게 관리할 수 있다. Markdown도 사용할 수도 있다고 하는데 기본적으로 사용되는 게 비슷하기 때문에 따로 사용하지는 않았다.
Requirements
공식 홈페이지에서 요구하는 최소 사양은 아래와 같다.
- Java 17
- Spring Framework 6
내가 적용했던 프로젝트의 정보이다.
- Java 17
- Spring Boot 3.0.4
- Gradle
- JUnit 5, MockMvc
JUnit 4를 사용하거나, MockMVC를 사용하지 않거나 하는 등의 경우에는 아래의 설정이 적용이 안 될 수 있는데 공식 홈페이지에 설정하는 방법을 자세히 기술해 놓았기 때문에 홈페이지를 참고하면 쉽게 설정할 수 있다.
시작하기
1. build.gradle 추가
plugins {
	id "org.asciidoctor.jvm.convert" version "3.3.2"
}

dependencies {
	testImplementation 'org.springframework.restdocs:spring-restdocs-mockmvc'
}

ext {
	snippetsDir = file('build/generated-snippets')
}

test {
	outputs.dir snippetsDir
}

asciidoctor {
	inputs.dir snippetsDir
	dependsOn test
}

asciidoctor.doFirst {
    delete file('src/main/resources/static/docs')
}

task copyDocument(type: Copy) {
    dependsOn asciidoctor
    from file("build/docs/asciidoc")
    into file("src/main/resources/static/docs")
}

bootJar {
    dependsOn copyDocument
}
❶ Asciidoctor 플러그인을 추가한다.
❷ mockmvc를 REST Docs에서 사용하기 위해 의존성을 추가한다.
❸ 생성된 스니펫들을 저장할 디렉토리를 지정한다.
❹ 테스트 task 설정에도 output 디렉토리로 ❸을 지정한다.
❺ 여러 문서가 생성되지 않게 하기 위해 이전 문서를 삭제한다.
❻ 만들어진 문서를 프로젝트 경로로 확인하기 위해 resources/statics 하위에 html 문서를 생성한다.
❼ jar 파일을 생성할 때 ❻의 과정을 실행한다.
추가적으로 gitignore에 생성된 html 파일을 추가해서 계속 변경되는 html을 업로드하지 않아도 되게 설정했다.
### Restdocs ###
**/src/main/resources/static/docs/
2. 테스트 코드 작성 및 적용
회원가입이 성공하는 테스트 코드를 작성했다. 이 테스트 코드에서 REST Docs를 적용해 보자!
@Test
@DisplayName("조건에 맞는 모든 필드를 입력받으면 회원가입이 성공한다.")
void when_allFieldsAreEntered_expect_joinToSuccess() throws Exception {
    JoinRequest joinRequest = new JoinRequest(EMAIL, PASSWORD, NAME, ROLE);
    JoinResponse joinResponse = new JoinResponse(EMAIL, NAME, ROLE, ActiveType.ACTIVE);

    given(memberService.join(any())).willReturn(joinResponse);

    ResultActions response = mockMvc.perform(post("/api/v1/members/join")
            .contentType(MediaType.APPLICATION_JSON)
            .content(objectMapper.writeValueAsBytes(joinRequest))
        )
        .andDo(print());

    response.andExpect(status().isOk());
}
❶ RestDocumentationExtension.class 적용
JUnit 5를 사용하면 아래 같이 Extension을 추가하자. 그러면 자동으로 빌드 툴을 감지해서 output 디렉토리를 설정해준다.
@ExtendWith({MockitoExtension.class, RestDocumentationExtension.class})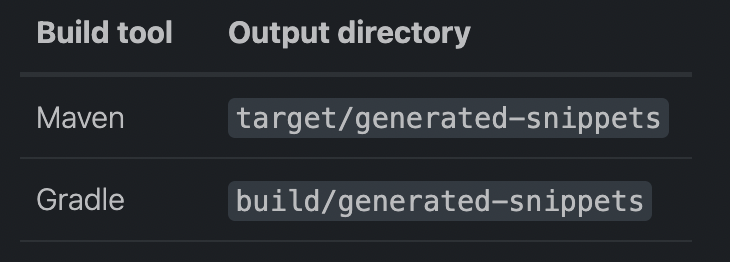
❷ MockMvc 설정
MockMvc에서 REST Docs와 관련된 설정을 할 수 있도록 @BeforeEach 어노테이션을 활용하여 설정한다.
@BeforeEach
public void setUp(WebApplicationContext webApplicationContext,
    RestDocumentationContextProvider restDocumentation) {
    this.mockMvc = MockMvcBuilders.webAppContextSetup(webApplicationContext)
        .apply(documentationConfiguration(restDocumentation)).build();
}
❸ 테스트 코드에 REST Docs 적용
이제 아래 파일들을 생성하기 위해 미리 작성된 테스트 코드에 적용해 보자.
mockMvc의 andDo() 메서드에서 document 설정을 하고 있다. 참고로 사용된 import문도 추가하겠다.
import static org.springframework.restdocs.mockmvc.MockMvcRestDocumentation.*;
import static org.springframework.restdocs.operation.preprocess.Preprocessors.*;
import static org.springframework.restdocs.payload.PayloadDocumentation.*;
ResultActions response = mockMvc.perform(post("/api/v1/members/join")
.contentType(MediaType.APPLICATION_JSON)
.content(objectMapper.writeValueAsBytes(joinRequest))
)
.andDo(print())
.andDo(document("member-join",
preprocessRequest(modifyUris()
.port(9090), prettyPrint()),
preprocessResponse(prettyPrint()),
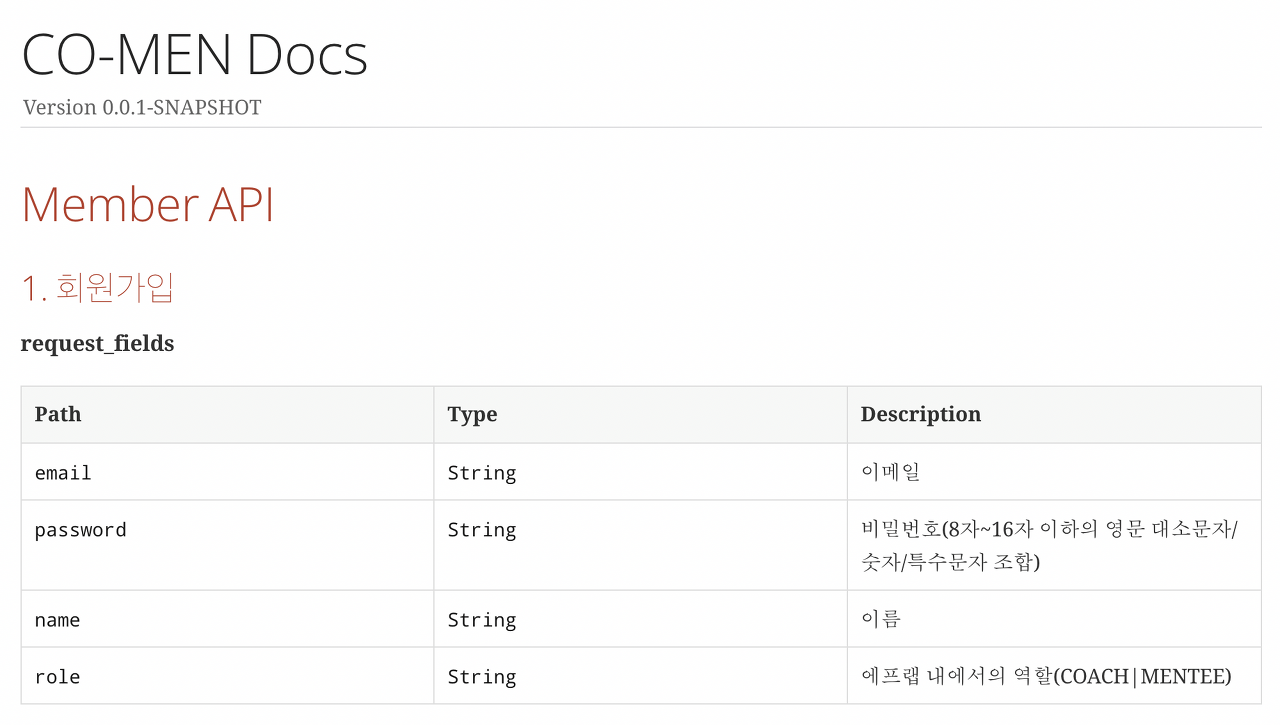
requestFields(
fieldWithPath("email").type(JsonFieldType.STRING).description("이메일"),
fieldWithPath("password").type(JsonFieldType.STRING)
.description("비밀번호(8자~16자 이하의 영문 대소문자/숫자/특수문자 조합)"),
fieldWithPath("name").type(JsonFieldType.STRING).description("이름"),
fieldWithPath("role").type(JsonFieldType.STRING).description("에프랩 내에서의 역할(COACH|MENTEE)")
),
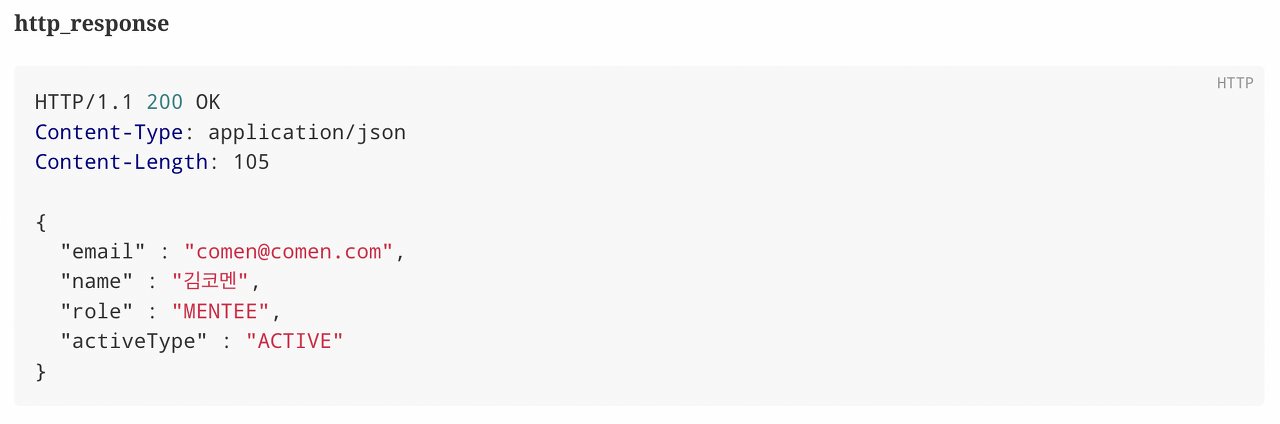
responseFields(
fieldWithPath("email").type(JsonFieldType.STRING).description("가입된 이메일 정보"),
fieldWithPath("name").type(JsonFieldType.STRING).description("가입된 이름 정보"),
fieldWithPath("role").type(JsonFieldType.STRING).description("가입된 역할 정보"),
fieldWithPath("activeType").type(JsonFieldType.STRING).description("가입된 계정 활성화 정보")
)));
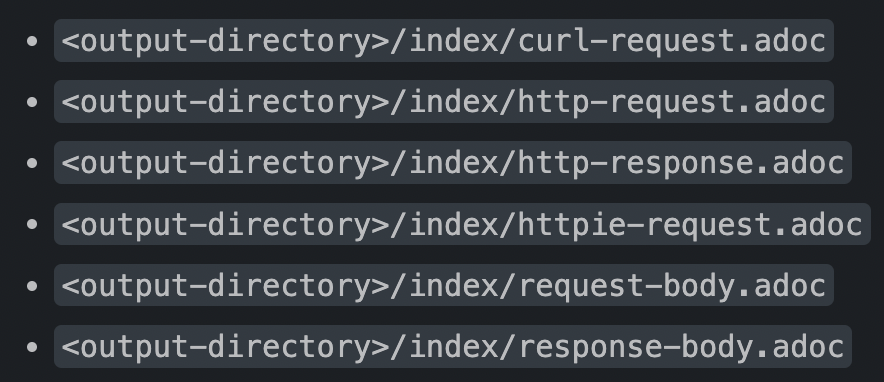
build/generated-snippets에서 생성된 스니펫들을 확인할 수 있다.

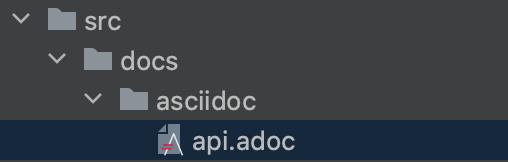
3. API 문서 작업
docs/asciidoc/api.adoc 파일에서 작업하면 된다.
AsciiDoc 문법을 참고해서 취향껏 작성하자. 아래의 예제 문서에서는 모든 스니펫이 활용되지 않았다.
ifndef::snippets[]
:snippets: ./build/generated-snippets
endif::[]
= CO-MEN Docs
:doctype: book
:icons: font
:source-highlighter: highlightjs
:toc: left
:toclevels: 4
:sectlinks:

== Member API

=== 1. 회원가입

**request_fields**

include::{snippets}/member-join/request-fields.adoc[]

**response_fields**

include::{snippets}/member-join/response-fields.adoc[]

**http_request**

include::{snippets}/member-join/request-body.adoc[]

**http_response**

include::{snippets}/member-join/http-response.adoc[]

---
참고로 Intellij에서 AsciiDoc 플러그인을 사용하면 Markdown 작업할 때처럼 프리뷰가 제공되기 때문에 편하게 작업할 수 있다.


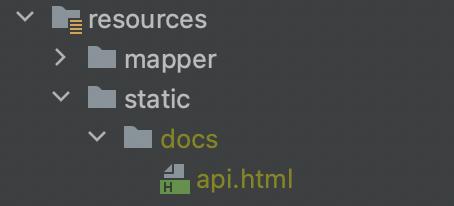
4. API 문서 확인
[프로젝트 경로]/docs/api.html로 해당 문서를 확인할 수 있다.

마무리
Swagger와 다르게 기존 코드의 가독성을 해치지 않고 문서를 생성할 수 있어서 좋았다. 문법도 마크다운과 크게 다르지 않아서 크게 공부해야 하는 내용이 없었고, 명확하게 API 명세를 확인할 수 있었다. 다른 프로젝트들을 보면 github 페이지로 만들어서 WiKi에서 계속 확인할 수 있도록 했는데 멘토님도 이 이야기를 해주셔서 나중에는 github 페이지로 적용해봐야겠다.
그리고 REST Docs 설정을 계속해서 반복적으로 테스트 클래스에 적용해줘야 하기 때문에 고민하다가 상위 클래스를 하나 만들었는데 코드가 깔끔해지고 반복을 줄일 수 있었다.
@AutoConfigureMybatis
@ExtendWith({MockitoExtension.class, RestDocumentationExtension.class})
public class ControllerTest {

	protected MockMvc mockMvc;

	@BeforeEach
	public void setUp(WebApplicationContext webApplicationContext,
		RestDocumentationContextProvider restDocumentation) {
		this.mockMvc = MockMvcBuilders.webAppContextSetup(webApplicationContext)
			.apply(documentationConfiguration(restDocumentation)).build();
	}
}
하위 클래스들에서는 상속받아서 편하게 사용할 수 있다.
@WebMvcTest(MemberController.class)
class MemberControllerTest extends ControllerTest { ... }
참고
'Spring' 카테고리의 다른 글
| [Spring Security] POST 테스트 : 403 Forbidden 에러 해결 (0) | 2023.05.17 |
|---|---|
| [Spring] 쉽게 이해하는 Spring Security + JWT 로그인 구현기 (0) | 2023.05.12 |
| [Spring Boot] com.mysql.cj.jdbc.driver not found (0) | 2023.03.31 |
| [Spring] @Transactional의 Transaction Propagation (0) | 2023.03.08 |
| @Valid exception handling (with BindException) (1) | 2022.11.29 |


